Showing posts with label audio. Show all posts

Wednesday, June 23, 2021

Low Cost Lapel Microphone for Webinars


Lapel Microphone with Earphone Jack
The sound with a headset and boom microphone is excellent, but I was getting tired of wearing these after 18 months of heavy Zooming. So I now have a lapel microphone. This differs from the ones normally used for audio recording, as it has a microphone/earphone plug compatible with smartphones and modern laptops. It also has a pop filter and comes with a socket for plugging in an optional earphone. It was on special for less than $AU12 in a local electronic shop.

The sound from a microphone near the presenter's mouth is better from that on a desktop computer. The lapel microphone can be secured to clothing, so it doesn't flap around, like those on earbud cables, being a distraction and making rustling sounds. Some prefer a wireless microphone, but that requires batteries which may fail. Also the cable stops you from wandering out of shot. ;-)

Lavalier Microphone

Headset Splitter Adapter
If you do want to be wireless, you can plug the microphone into your mobile phone and use that for the audio, while the desktop computer is used for video. There are also adapters which allow separate microphones and earphones to be plugged, and earphones with a clip on the inline microphone. Zoom and most other video-conference applications have an option for audio to come from a phone and combine this with video from a computer. It has the advantage that if the computer link is lost, you can keep talking using the phone. 

Most convenient I have found is to put the microphone and earphone cables down the inside front of my jacket, to the phone in a pocket. This way, if I need to I can get up and walk around. This is much as a lecture theater wireless lapel microphone is used, but the range is longer: anywhere the mobile network is available. 

Thursday, January 28, 2021

Movable Webinar Backgound


A mattress overlay provided a good temporary backdrop for video conferencing. However this was cumbersome to set up, so I now have a freestanding woven rattan screen. This is 1700 mm high with four folding panels each 400 wide (making 1600 mm total). 


The screen is light and easy to move, being able to be folded and put in a corner when not needed. The one I chose is woven rattan in natural finish. These are available with fewer or more panels, but four seems about right.

Thursday, January 21, 2021

Temporary Webinar Studio

Temporary Webinar Studio
As I visited Sydney during a COVID-19 outbreak, I will be unable to return to Canberra, for some time. So I have set up a temporary webinar studio in Sydney. To provide a neutral background, and absorb excess noise, I propped a mattress overlay behind a chair. 

The mattress is queen size and resting on two chairs. The chair I sit on is between them. This keeps the mattress in place and also curves it slightly, providing extra absorption of background noise from the side. I use a headset microphone to further reduce noise.

This worked fine for the first webinar in my new series "Engaging students in the online environment" in the Microlearning Series at Maskwacis Cultural College, Canada.

There are specially designed booths used for podcasting from offices, using sound absorbent foam. However, a simpler setup, with an  acoustic panel of the type used for office partitions, curved and mounted on wheels might work well in a shared office.

Saturday, April 11, 2020

Online Tools for Education: Discord for Harmony?

Discord is an audio chat system intended for video gamers. The idea, as far as I understand it, is that you play a game together, while talking via Discord. About the only useful feature I can see, from an educational point of view, is that Discord allows for telephone quality speech, which uses much less bandwidth than the video conferencing systems.

Tuesday, September 26, 2017

Podcasting Booth

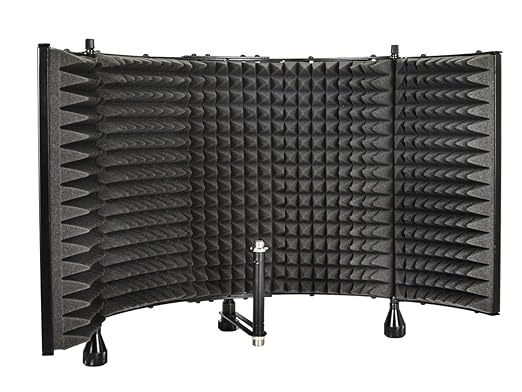
One of the problems with making podcasts and videos is where to record the audio and video. Few can afford a dedicated, purpose built soundproof studio. There are options from a desktop microphone isolation shield made from about US$12 of material to a mini-recording studio costing thousands of dollars.

For audio only, you can use a "Microphone Isolation Shield". This is curved sheet of sound absorbing material placed around three sides of a microphone. You place your head into the open side and the material shields much of the extraneous noise. These cost around US$100, but one of my colleagues has built one from acoustic foam panels (about US$12). This might be used for a talking head video, by placing the camera at the back of the shield. But it would be better for a voice-over of a slide show.

On a larger scale the Inspire Center at University of Canberra have a library style carrel covered with carpet. It is remarkable how quiet this is when you sit in it, with the material on the side walls and top absorbing outside noise. With a suitable backdrop, this could be used for video as well.

The Inspire Center also has a "podcast" room, which is essentially a small soundproof audio recording studio. This is needed for recording high quality podcasts. Otherwise stray sounds, which are not evident to someone in the room can be distracting on recordings.

Peter Capaldi, who played Doctor Who, at the ABC's TARDIS control room
One step up are the telephone box sized radio interview booths at the Australian Broadcasting Corporation, colloquially known as a "TARDIS". These are lined with acoustic panels. The booths are used for audio only, but with a backdrop this set-up could be used for a talking head video.

Monday, September 16, 2013

Push-to-Talk Headsets for Webinars

At 1pm AEST (0300 UTC) Tuesday 17 July I am presenting a free seminar on "MOOCs with Books" hosted by SA E-learning Support Services, for vocational educators (everyone welcome). While testing the setup on Friday I found the sound was distorted. It turned out the audio mixing software in Linux was causing a problem, which was easily bypassed.

About every computer based video/audio-conference I attend has a few minutes at the start where people sort out audio problems. Some of these problems can be solved with low cost hardware. Rather than giving new on-line staff and students a useless gift (such as a flash memory wrist strap), a Push-to-talk Headset (costing about $10) would be useful.

Headsets are readily available, some with push-to-talk buttons, but ones with push-to-mute ("cough" function) are rare. So I built myself an adapter to provide this function. The adapter has two 3.5 mm plugs for the microphone and headphone sockets on my laptop. The p[lugs are cabled to a small box with two switches and two sockets. A toggle switch selects microphone off/on. With the switch in the off position, a press button provides "Push-to-Talk". With the switch on the off position, the button provides "cough" function (pressing the button cuts off the microphone). There are 3.5 mm and 2.5 mm sockets for different headsets. The parts for this cost about $12.

Thursday, July 18, 2013

Audio Recording Options for an On-line Course

Recently I was asked about recording options for on-line courses. The simplest recording option when creating an on-line course is not to use any audio or video. I created a whole 12 week course for which I recorded no audio and no video. I do refer the students to relevant video and audio produced by others, but I only supply text myself. This course, "ICT Sustainability", is popular with students and got me an award from my peers.

When I am producing audio I use a USB Headset. This puts the microphone close to the mouth and the audio is digitized in the headset, which improves the quality. MP3 is fine for the audio format.

If you are recording with a live audience, see if your institution has a built in recording option. The Australian National University has lecture theaters equipped with a recording system which takes the audio from the room PA system and the video from the main screen. This saves having to worry about a separate microphone. I just have to remember to press "Record" at the start and "Stop" at the end and a podcast is produced. The ANU system is called the Digital Lecture Delivery Service and many universities have similar facilities.